
| Screenshots |
|
|
| Links |
|
Electrobel |
| RSS Feed |
|
|
| Hosted by |
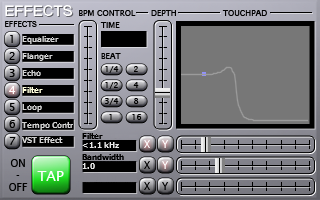 The effects currently included are a 3-band equalizer, flanger, echo, gapper, loop, tempo control, filter and bitcrusher. You can select an effect by clicking on the number next to it. You can assign a different effect to a certain number by right-clicking it. Since there are only 7 slots available, this is also necessary to select some of the effects not listed by default. To enable an effect, press the ‘TAP’ button. The parameters that can be controlled depend on the effect. The touchpad can be used to control 2 parameters at once.
You can change which parameters are controlled by the touch pad by using the ‘X’ and ‘Y’ buttons next to each parameter. All effects are tempo-synchronized.
This is the effect you are probably going to use most in your mixes. To cut away a frequency-band, lower the vertical sliders on the mixer window. The equalizer tab on the effects panel allows you to change the frequency at which each band works. You can use this to cut more or less from the sound. Moving the slider ‘low eq freq’ more to the right will cut or boost more of the bass of the sound. Moving the slider ‘high eq freq’ more to the left will cut or boost more of the high frequencies.
First press the tap button to enable the effect, and then use the depth slider to control the amount of the effect, and use either the buttons or the slider to control the length of the effect. You can use the ‘high pass’ parameter to make sure the effect doesn’t affect the bass frequencies. The ‘mode’ and ‘sound’ sliders can be used to adjust the sound of the flanger.
This effect has a lot of parameters, but you can get a lot of cool effects out of it when you understand how to use them. The depth slider controls how much of the sound is echoed. You normally shouldn’t set it at 100%, because that will make the sound go louder and louder, until you only get a lot of noise. The length slider controls the length of the echo. You can also select the length as a number of beats by using the buttons.
The high and lowpass sliders control how the echoed sound is filtered.
The gapper is an effect that quickly turns the sound on and off. The speed can be selected with the length slider, or with the buttons. The depth slider controls the strength of the effect. The shape parameter switches between square and sine wave behavior. Sometimes the square wave behavior is too strong, so you can better use the sine wave behavior.
The loop tab is just an extension to the loop buttons on the decks. The difference is that you get a lot more options ranging from ¼ beat up to 16 beats. You can also move the loop forward and backwards, and increase/decrease the length of the loop using the X and Y buttons. Right-clicking the button will move the loop by one beat or change the length by exactly one beat.
To use this effect, simply turn it on with the tap button. When turned on, whenever you change the speed of the record, the pitch remains the same (so your songs will sound faster, but not higher). This is quite useful when you have 2 records that you want to match together that are very different in speed. If you set the ‘automatic’ parameter to the left, you can manually change the tempo with the tempo parameter, which will make the music sound higher or lower, without affecting the speed.
You can select this effect by right-clicking an effect slot number and select ‘filter’. First enable it by pressing the tab button, and then use the filter slider to filter the sound. When you move the slider to the left, you will cut off high frequencies first, and when you move the slider to the right, you will first cut off the low frequencies.
Use the bandwidth setting to specify the resonance of the filter. (Lower means more resonance)
This effect actually introduces specific kinds of distortion. The bit-depth parameter changes the amount of bits used to represent one sample. The downsample parameter specifies how much to reduce the samplerate of the sound. The downsampling is done with a very simple algorithm that also introduces some new sounds. The easiest way to understand what it does is simply trying it.
Finally the overdrive parameter is just a gain followed by soft clipping, creating a very hard and distorted sound.
To load a vst effect, use the Load button. To enable it, use the tap button.
The first 7 settings can be edited with the sliders on the effect panel. Some vst effects include a graphical user interface to edit all parameters. You can open this interface by using the ‘Show’ button. With the drop down you can select a preset if the plugin has any presets defined.
Currently, in the default skin, there are 2 vst effect slots available (you can replace any of the other effects with the second vst effect slot by right-clicking the number in front of the effect, and selecting vst effect 2) This means you can have 2 vst effects loaded and working at the same time.
It is also possible to apply a VST effect to the master output instead of one specific deck. (Can be useful to load a compressor/limiter or equalizer for example)
It is only useful when using djDecks’ internal mixer, and can be used by right-clicking the Menu button on the mixer window.
djDecks (c)2003-2023 Adion
