
| Screenshots |
|
|
| Links |
|
Electrobel |
| RSS Feed |
|
|
| Hosted by |
Vinyl Control allows you to control any music file on your computer by manipulating a special control vinyl or control cd, as if the song was actually on this vinyl or cd.
This allows you to use your turntables or cd-players in the way you were used to (including scratching, pitch bending, changing position, ...) and at the same time take advantage of having your entire music collection available on your computer, applying loops and effects, beat detection etc...
To use vinyl control, you need to connect your turntables or cd-players outputs to your computer. For this you need an audio interface with the correct type of inputs.
You will find 2 types of signals, phono level signals, and line level signals.
Classic turntables have phono level outputs. This is a very weak signal, that also has specific frequencies filtered in a specific way. It is recommended to connect this type of signal to a phono level input on your audio device, which amplifies the signal and correctly filters the signal. If your audio interface does not have a phono input, it is possible to amplify the input signal using a separate phono pre-amplifier.
If your audio interface only has line level inputs, and your turntable only has phono level outputs, it can still work to connect these for vinyl control usage. You will not be able to play regular vinyls this way, and how well vinyl control works will depend on the output of the needle you are using, and the sensitivity of the inputs. It will usually not work as good as correct connections, but can be useful to try the setup before investing in additional equipment.
Some modern turntables, and all cd-players, as well as most other audio devices have line level outputs. These can be connected to line-level inputs on your audio interface. If an input or output is not specifically labeled phono, it is usually line level.
Once you have your turntables connected to your audio interface's inputs, and connected the audio interface's outputs to your mixer or speakers, first configure the inputs and outputs in djDecks.
More information about this can be found in the sound card configuration.
Now to configure djDecks, first load some tracks in each deck and make sure they play correctly by using the play button. This ensures that your outputs have been configured correctly.
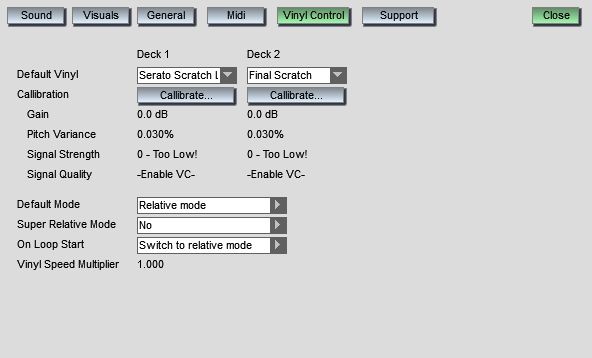
Next open the Options window, and go to the Vinyl Control tab. If you have just installed djDecks, click the 'default vinyl' drop-down, and select 'Download plugins...'
When the plugins have been downloaded, select the type of vinyl you want to use. When selecting MsPinky, you will also get the choice of MsPinky generation you are using (which includes the PCDJ Reflex and Numark Torq vinyls)
Once the correct type has been selected, put the needle on the record, start playing it, and press 'callibrate'. Vinyl Control will be activated, and you should see the track you loaded starting, and see the Signal Strength and Quality.
If the signal strength is too low, or too high, try changing the input level. Some audio interfaces will have knobs for this on the device itself, or will have a control panel with sliders to change the level.
When the level is set correct, press 'callibrate' again.
On the Vinyl Control tab of the mixer, the 'VC' button will activate or de-activate vinyl control on the selected deck. The 'ABS' button allows you to switch between absolute or relative mode. In absolute mode, both the position of the record and the pitch are used, in relative mode only the pitch is used.
The 'IN' button will start line input, which can be used to play regular vinyls through djDecks.
The 'MR' switch is used for 'Mute Reverse', which mutes the sound while the record is spinning backwards. This can make scratch tricks easier to do.
When Super Relative Mode is enabled, this will make mixing using vinyl easier. Whenever you activate vinyl control or change the tempo using the match button on-screen, the vinyl speed multiplier is adapted to fit the current pitch.
This means that your deck on screen could be at pitch +3%, while your turntable is still at 0%.
When you now move the pitch on your turntable to +2%, the pitch on-screen will be +5%.
This allows you to use the benefits of auto-matching with the feel and control of vinyl.
Vinyl Speed Multiplier: With this value, you can use the 33rpm sides of the timecode vinyl at 45rpm or vice versa. Because the timecode can usually be read more clearly at 45 rpm, it can be useful to use the 33rpm side at 45rpm if you are having some unstable pitch problems.
You can also use this multiplier if you want to move your turntable's pitch range higher or lower.
A value of 1.36 allows you to play the 45 rpm side at 33 rpm, a value of 0.73 allows you to play the 33 rpm side at 45 rpm.
Lead In Time: This is the time at the beginning of the timecode that will not be used. Since the beginning of the vinyl will wear out the fastest, you can increase this value to set the start a bit later. Some versions of the final scratch vinyls did not have a lead in timecode. If this is the case you may to set this value negative to -25000 in order to have the song start at the start of the vinyl.
-vinylcontrol: By adding -vinylcontrol to the djDecks shortcut's command line, djDecks will start vinyl control on decks 1 and 2 automatically when opening djDecks.
djDecks (c)2003-2023 Adion
