
| Screenshots |
|
|
| Links |
|
Electrobel |
| RSS Feed |
|
|
| Hosted by |
There are two sides on the browser window, a playlist side that will show the selected playlist (waitlist.m3u is the default playlist that is opened when starting), and a browser part on the other side that allows you to browse the folders on your computer, but also your playlists and iTunes library.
 Playlists allow you to group songs together so that you can find them more easily when you need them later, or they can be used to make a list that will be played automatically.
Using the case button at the bottom, you can select which playlist to load, or create a new playlist. By default there is a playlist called waitlist.m3u that is loaded on startup, and a folder called logs that contains a log of all files you played grouped by date.
The playlists shown here are stored in your user settings folder (access it using Menu->Open Settings Folder, and open the playlists folder). They are stored in the m3u file format, that can be saved and opened by many other programs. This allows you to easily back up, sort and delete your playlists, and also allows you to copy playlists from other programs.
Double-click a file to load it in a free deck, or drag&drop it to the deck you want to load it in.
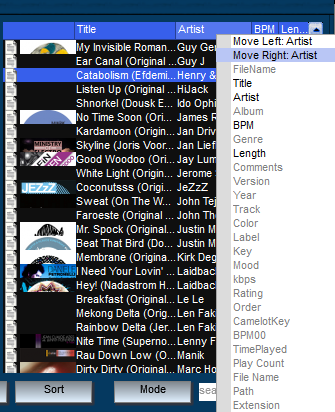
The columns that are shown can be customized by right-clicking them. This will bring up a list that allows you to add or remove columns or move them.
If you need to see more information about a file, you can click it while holding the alt button, or click it with the middle/third mouse button (or scroll wheel). This will show the album art for the file, as well as info such as playcount, last played time, file location etc...
More information about the playlist itself is also available by right-clicking the scroll bar area. This will bring up the playlist's name, the number of files, the duration of the playlist, when it was created and last modified and some other information.
The playlist button can be used to export a playlist or load a playlist from another location on your computer. It also allows you to sort or shuffle the open playlist.
The browser allows you to navigate the folders on your computer. The easiest way to navigate is by adding favourites. Right-click a folder and select 'Add to favourites', or click the Favourites button and select 'add favourite...' to select a favourite folder to be added.
Favorite folders will always be available at the top of your folder list or from the favourites button.
Under the favorite folders you can also browse your playlists, and there's also an iTunes item to browse your iTunes playlists.
Double-clicking a file will either load it in a free deck, add it to the currently opened playlist, or do nothing, depending on an option set in Menu->Options->General.
It is also possible to drag a file to a playlist or to a deck.
To manage your files, the right-click menu also has options to move the file to a different folder, delete the file, or edit the file's tag information.
The autoadvance button activates or de-activates autoplay. When autoplay is enabled, songs will automatically be played and faded. When no specific autoplay folder is selected, files will be played from the waitlist, or when that is empty from the currently opened folder.
You can select a playlist or folder to be used for autoplay by right-clicking it in the folder list and selecting 'set autoplay folder'.
.png) Right-clicking the autoadvance button shows you various autoplay options.
Right-clicking the autoadvance button shows you various autoplay options.
The mix mode selects the way tracks are mixed. Basic simply fades from one track to the other, beatmatching tries to beatmatch tracks and mix them. Fully automatic will also select the fade time automatically.
Enable shuffle mode to play songs in a random order, and enable repeat to start the playlist from the start when all songs have been played.
The fade time selects how long it takes to mix from one song to another, and a negative fade time will add a gap of silence between the mix.
The fade start position indicates at what point in the mix that the other song should start. At 0% (default) the other song will start as soon as the fader starts moving. At 50%, the other song will only start when the crossfader is in the center, so that you don't miss the intro of the next track. At 90% it will only start near the end of the mix, when the song that you are mixing from is also almost completely fade out.
It is recommended that if you want to manually mix some songs in-between you disable autoplay, and re-enable it when you are finished. It will automatically continue playing the songs in the playlist after the currently loaded songs.
To search for tracks, simply enter any part of title, artist, album, ... in the search field. You can narrow search results by adding more search terms, separated by a space.
If you need to search for a specific term with spaces, add double quotes around them. (For example "michael jackson" will search only for songs containing "michael jackson", whereas michael jackson without quotes will find all songs that contain both "michael" and "jackson" somewhere in the tag, but not necessarily next to each other)
You can also further refine the search by starting it with 'title:', 'artist:', 'album:', ... (for example 'artist:jackson')
To find the songs you search for, a tag database is used that contains the tags for all songs that can be searched.
Folders are automatically added to this database while you browse them, but it is easier to build the tag database manually the first time, or whenever you added many new songs or re-arranged folders. To do this, simply right-click the parent folder, and select 'build tag cache'. This will add this folder and all it's sub-folders to the tag database. This work is being done in the background, and could take some time depending on the number of music files you have.
If you are having problems with searches containing results of files that are no longer available, it is recommended that you perform a tag database clean up. This can be done from Options->Support.
It will check all files and folders in the tag database, and remove those that no longer exist. It will also correct BPM tags for use by smart playlists.
Smart playlists are dynamic playlists that are generated in real-time based on a set of rules. You could have a smart playlist for all your files with genre 'house', or music from before 1995, or files created in the last 100 days to name some examples.
Smart playlists can be created by right-clicking the 'playlists' item in the folder list, and selecting 'create new smart playlist...'
Each line in a .spl file is one rule, and all rules are combined with an 'and' rule. On a single line, you can combine 2 rules with the 'or' keyword as well.
There are also 2 special commands, 'group by' and 'sort by'.
An examples will make it easier to understand:
genre contains house
group by year
sort by artist
This will list all tracks in your library with genre 'house' and sort them by artist.
The group by clause will list various years as sub-folders. By clicking the sub-folder 2005 for example, you would see only house tracks from 2005.
The group by clause can also be extended by adding 'range'
group by bpm range 5
This will add subfolders like 120-124, 125-130, ....
Three fields are date-dependent: modifieddays, createddays and lastplayeddays
They indicate the number of days that have passed since the file was created, modified or last played.
Example: lastplayeddays < 14 will show the files that have been played in the last 14 days.
If you want to search for a value consisting of multiple words, you have to add double quotes around it.
Example: artist contains "michael jackson"
The fields that can be used are: modifieddays, createddays, lastplayeddays, playcount, path, artist, title, album, genre, version, bpm, comments, year, color and any.
The verbs that can be used are: contains, is, doesnotcontain, startswith, endswith, =, >, <, >= and <=
It is possible to play music directly from an audio cd, or rip the audio cd to your computer.
To do this, insert the audio cd and select the cd drive from Select Drive... or from the folder list.
The titles will be read from CD-Text if available, or from freedb, an online database of cd titles.
These titles are also stored locally, so that when you insert the same cd later when no internet connection is available, the titles can still be displayed.
Playing a track from the audio cd can be done just like you would play another track on your computer, by dragging it to one of the decks.
Ripping a track can be done by right-clicking the track, and select 'Rip Selected Tracks...'. You can also use CTRL+A to select all tracks.
You will then be given the choice to select where to store the track, and also select the format the tracks are stored in (mp3, ogg, wav, aiff or flac)
The tracks will then be extracted to your computer in the background. (In windows 7 you can see the progress in the task bar, otherwise you can see it in Options->Support)
djDecks (c)2003-2023 Adion
