
| Screenshots |
|
|
| Links |
|
Electrobel |
| RSS Feed |
|
|
| Hosted by |
This guide describes how the many possible configurations of audio interfaces and external hardware can be setup correctly.
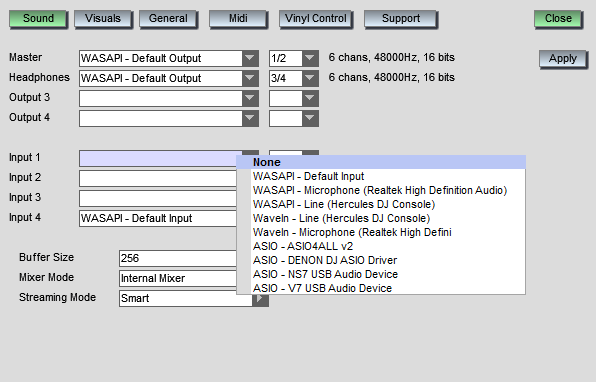
Everything described here can be configured in Options->Sound.
This means that the mixing of the different decks is done by the software. A midi controller can be used to control the volume, equalizer and crossfader, or this could be done with keyboard and mouse.
In this case the first output is the master output, where the mixed sound will be sent to. Optionally, the second output is the pfl output that you can connect your headphones to so that you can pre-listen a track before it is played live.
Make sure mixer mode is set to internal mixer.
Many professional audio interfaces have multiple outputs, and many midi controllers also have an integrated audio interface with both a master line output and an amplified headphones output. These interfaces usually include an ASIO driver, which usually gives you the lowest latency. For Windows 7, WASAPI is usually also a good choice and for Mac OS X Core Audio is used all the time and is also capable of low latencies.
Many home audio interfaces also include multiple outputs, usually for surround purposes. You can then use the front output for the master output and the rear speaker output for your headphones for example. To make this work, you have to make sure that the sound card is configured in windows to make use of the surround outputs. (Control Panel -> Sounds -> Configure the selected playback device and select Quadrophonic or 5.1)
Now select the same output device (for example 'WASAPI - My sound card' or 'ASIO - My sound card') for both output 1 and output 2.
The channels right of the selected sound card select which output to use. 1/2 is the first stereo output, 3/4 is the second stereo output and so on.
Usually you want the first (master) output to go to output channels 1/2, and the second (headphones) output to go to channels 3/4.
On some audio interfaces this will be different, so check the sound card's manual if it doesn't work.
It is possible to use one interface for the master output and another for your headphones. (You would also use this if you use USB headphones)
While this can work, it isn't recommended because it is possible that there will be a delay between what you hear through the master output and what you hear in your headphones, making it difficult to accurately beatmatch multiple songs.
Simply select the sound card you want to use for your speakers as output 1 and the sound card you want to use for your headphones as output 2.
In this case you will usually want to select the first output channel of each sound card, so select channels 1/2 for both outputs.
If you are on a budget and only have a single stereo output on your computer, you could also buy a cable to split the stereo signal into one mono output for the speakers (left output) and one mono output for your headphones (right output)
Simply select your sound card for both output 1 and output 2, and select channels 1/1 for output 1 and 2/2 for output 2. (If you want left and right the other way around you can of course select 2/2 for the first output and 1/1 for the second output)
Because the mixing is done internally by the software, you can just use the record button to start recording a mix. Simply select the location, file name and file type and the recording will begin.
This means that the mixing is done by a real mixer. The software sends out each deck to a different output, and the sound is mixed by the mixer. Controlling volume, crossfader, and equalizer is usually done on the mixer, and you also connect your headphones to the mixer.
The first output will send out the output of the first deck, the second output will send out the output of the second deck etc...
If you only have 2 outputs available, it is still possible to use 4 decks. In this case both deck 1 and 3 will be sent to the first output, and both deck 2 and 4 will be sent to the second output.
Make sure mixer mode is set to external mixer.
Select the sound card that you want to use for each of the outputs that you want to use. (If your sound card has 2 outputs, select it for output 1 and output 2)
The channel numbers will usually be 1/2 for the first output on your interface, 3/4 for the second output etc...
It is also possible to use multiple audio interfaces. You can use one interface for each deck, but you could also use one interface for the first 2 decks, and another one for the other 2 decks.
For each output, select the sound card that you want to use, or leave it empty if you don't have a device for that output. Select the channels, usually 1/2 for the first output of each device, 3/4 for the second, etc...
If you are on a budget and only have a very limited amount of outputs, you can use mono signals instead of stereo to double the amount of outputs you have. Splitter Y-cables exist to connect the mono outputs to stereo inputs on your mixer.
Simple select the sound card you want to use for each of the outputs, and select the mono output channel to use. The left output will be 1/1, the right output 2/2, ...
Because the actual mixing is being done by the mixer, the computer can't record the final mix directly. To record a mix, you need a signal from the mixer back to your computer. Many mixers either have a booth output or a dedicated record output for this purpose.
Connect it to a line input on your computer (it can be on the same audio interface as your audio interface, but you could also use your computer's built in line input for this)
Once connected, configure this input as input 4 in the software. Select the required audio interface, and select the input channels. (usually 1/2 if the interface you are using only has one pair of inputs)
Now when you use the record button in the software, it will record your mix from this selected input.
The buffer size determines the number of samples that are being processed at once. A larger buffer size gives the computer more room to do all the work and thus reduces the chance that the buffer isn't filled in time leading to audio distortion ranging from small clicks or dropouts to heavy cracking. On the other hand, a smaller buffer size reduces the latency between your actions so makes it easier to work with.
Basically you want the lowest latency that your computer and audio interface is capable of. Latency depends on the audio interface used, the audio interfaces drivers, your computer's speed and the driver that is being used.
ASIO, WASAPI and Core Audio are preferred, Direct Sound will usually require a larger buffer size.
For Direct Sound, WASAPI and Core Audio, you can select your preferred buffer size from the drop down menu. Select a lower value if you want a lower latency, or a higher value if you are experiencing audio problems.
After pressing 'Apply' you can see the actual latency in grey at the bottom of the drop-down menu, both in samples and in milliseconds. Note that the buffer size may automatically be increased if audio drop outs are detected.
For ASIO the latency or buffer size can usually be controlled from the sound card's control panel. In the drop down you will get an option to open the ASIO control panel if you have selected a ASIO input or output.
The preferred mode is smart which will automatically select streaming mode or not based on the amount of memory you have and if the waveform has already been calculated or not.
Turning streaming mode on will always load songs in streaming mode, which loads only a part of the song in memory. The advantage is reduced memory usage and the ability to seek through the song to any position anytime.
Turning streaming mode off will load the songs entirely to memory. For very long songs or pc's with a limited amount of memory streaming mode is still used. The advantage is that because the entire song is loaded at once, the waveform will be completely visible as soon as possible, even if this is the first time you load the song. It will also allow you to play the entire song backwards without interruptions, and seeking to other positions is slightly faster once the song is loaded. The disadvantage is that depending on your computer speed it can take a while before the entire song is loaded.
Audio inputs can be used for vinyl control, playback from external devices such as cd players, vinyl, mp3-players, ... or for connecting a microphone.
By default, input 1 will be used for the first deck, input 2 for the second deck etc... but depending on the skin you use it is possible to use any input for any deck.
Selecting the inputs works similar to selecting outputs. Select the audio interface you want to use, and then select the channels from that device to use for that input.
If you only have one input but want to be able to easily use it on the deck of your choice, simply select the same device and the same input channels for each of the inputs.
djDecks (c)2003-2023 Adion
