
| Screenshots |
|
|
| Links |
|
Electrobel |
| RSS Feed |
|
|
| Hosted by |
Official Hercules DJ Console 4-Mx website
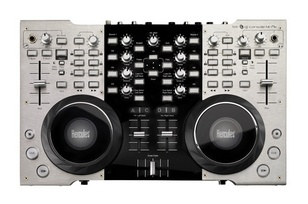
To use the DJ Console as a controller, go to Options->Midi, select the Hercules DJ Console 4-Mx midi device, and select the hercules_djconsole4mx.xml mapping.
Also make sure that you select 14-bit midi in the hercules control panel (can be accessed from the system tray)
The DJ Console can be used in ASIO or WASAPI mode. ASIO is recommended for lowest latency and when you want to use the line or mic inputs.
In Options->Sound, select the DJ Console 4-Mx for the first two outputs (with output channels 1/2 and 3/4).
If you also want to use the inputs, also select it (preferably ASIO) for the two inputs (with channels 1/2 and 3/4)
The play/pause and cue buttons will work the same as on-screen, depending on your selected cue mode.
The crossfader, line faders and equalizer knobs will also work as expected. The kill switches can be used to cut specific frequencies with one press on the button.
The gain knobs can be used to ensure that the songs are played at the same volume level.
The cue select buttons allow you to listen to the track in your headphones before mixing.
By default, the jog wheels can be used for pitch bending on the outside, and for scratching by pressing the center of the jog wheel.
The scratch button allows you to disable the scratch function of the jog wheels.
The Forward/Back buttons can be used to seek through the song.
The Pitch Bend + and - buttons can also be used to temporarily change the speed of the track.
The Pitch slider allows you to change the pitch of the track. By default it works in relative mode, which means that the pitch will be increased or decreased relative to the current pitch. When set to absolute mode (from Options->Midi) the center of the slider will always be 0%.
The Pitch Scale buttons will change the range of the pitch slider. (From +-4% to +-100%)
Hold the pitch scale button pressed for at least one second to reset the pitch back to 0%.
The Sync button matches the bpm of the song with the bpm of the song on the other deck. Hold the Sync button pressed for more than a second to also synchronize the song's beat alignment.
To select songs, use the Up/Down buttons to scroll through your files or folders. Click folder to select the list of folders, and Load on deck to open the folder. Click files to select the list of files, or switch to your playlist. Click Load on left/right deck to load the selected song to that deck.
Hold the Source button to switch the deck to play music from the line inputs at the back of the controller. You will still be able to use line faders, effects and equalizer while doing so.
The 6 numbered buttons allow you to control cue points, loops and effects.
With shift disabled, 1 will set the start of a loop, 2 will set the end of the loop and start the loop. (The loop is automatically beat-synchronized) Use 2 again to exit the loop, and use the Ctrl knob to halve or double the loop length.
Buttons 3, 4, 5 and 6 will play cue points 1,2, 3 and 4. To record a cue point, hold the stop button, and then press one of the cue point buttons.
With shift enabled 3 will start a flanger, 4 will start the echo, 5 will start the bitcrusher and 6 will start the filter effect. Once enabled, use the ctrl knob to control the strength of the effect.
The DJ Console 4-Mx can be used to control up to 4 decks. Use the Deck C and Deck D buttons to switch between controlling deck 1 and 2 to controlling deck 3 and 4.
djDecks (c)2003-2023 Adion
