
| Screenshots |
|
|
| Links |
|
Electrobel |
| RSS Feed |
|
|
| Hosted by |
Official Pioneer CDJ-2000 website
 The latest djDecks DX beta is required to use this device.
Go to Menu->Options->MIDI
There you should see the CDJ-2000 listed as "HID - Pioneer CDJ-2000"
Click it and select pioneer_cdj2000.xml
If you have 2 (or more) units, do the same for each. Now right-click the other units, and select a player offset for each (+1 for the second, +2 for the third, ...)
This ensures that each unit will control a different deck.
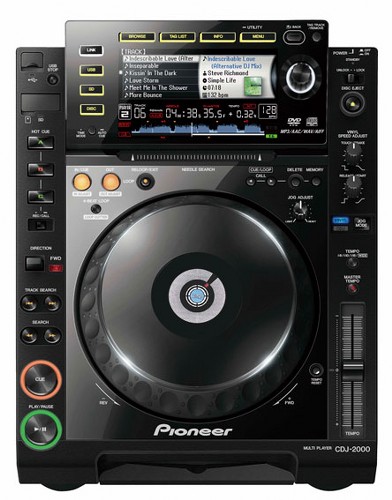
The CDJ itself should be configured in 'HID Advanced' mode. This requires firmware 3.10 or later (check the Pioneer website for more information).
To select this mode, keep the Utility (Menu) button pressed until the menu shows up.
Scroll down to 'Hid setting', click, and make sure 'Advanced' is selected instead of 'Standard'.
Go to Menu->Options->Sound.
For Output 1 and Output 2 select 'ASIO - Pioneer ASIO', and select the output channel numbers. (1/2 for the first, 3/4 for the second)
If you have more units, select the other outputs as well.
From the Pioneer CDJ ASIO utility you can also select 24-bit output and adjust the latency if required. (Select a larger buffer size if you get audio dropouts)
In 'Browse' mode, you should see the track artist and title of the currently loaded track. A number icon should also appear displaying the deck that is controlled by that unit.
Use the browse knob to browse through your tracks. The top line will show the current folder or playlist, the other lines will show the selected item in the list. Click the browse knob to load a track or open a folder. Use 'Back' to switch between files, folders and playlist. Use Tag Track to add the selected song to the current playlist.
The Info tab will show additional info about the loaded track.
Play/Pause cue will work the same as in djDecks, depending on the selected cue mode.
The search buttons can be used to seek through the song. (Beat-aligned 30 seconds forward, or 10 seconds backward)
The Rev button reverses playback.
The Vinyl Speed Adjust knobs can be used to select a slower ramp up/down speed when pressing play or pause buttons to simulate a vinyl startup/brake down sound.
The 4 auto beat loop button can be used to quickly start a 4-beat loop. Hold it pressed for a second to start an 8-beat loop.
A loop can also be started using the Loop In button at the start of a loop, and the Loop Out button at the end of the loop. Press Reloop/Exit to exit the loop, or to return to the last used loop.
While a loop is active, hold the In button and turn the jog wheel to move the loop forwards of backward. Hold the out button and rotate the browse knob to halve or double the loop length.
The 3 hot cue buttons can be used to instantly load a stored cue point. To store a cue point, press the Rec button under the buttons, then press the cue point number when the track is at the position you'd like to store. To go back to regular mode, keep the rec button pressed for a second.
Hold the Delete button pressed for a second to enter cue delete mode. In cue delete mode, presing one of the hot cue buttons will remove the cue point stored in that slot.
Use the outer ring of the jog wheel to perform a pitch-bend. Press the inner platter to scratch the sound when Vinyl mode is active. When Vinyl mode is disabled (using the 'Jog Mode' button) the inner platter will also be used for pitch-bend.
The pitch slider can work both in relative or absolute mode (see Options->Midi to select this)
The Tempo button cycles between 6, 10, 16 and 100% pitch ranges. Keep the Reset button pressed for 1 second to reset the pitch to 0%.
Use the master tempo button to turn master tempo on or off.
djDecks (c)2003-2023 Adion
